# [物件導向 Ep. 2] 三大特性
###### tags: `MCL` `oop`
References
~ - SpicyBoyd's Blog: Class Diagram 類別圖 [上篇](https://spicyboyd.blogspot.com/2018/07/umlclass-diagram-introduction.html)/[下篇](https://spicyboyd.blogspot.com/2018/07/umlclass-diagram-relationships.html)
- [[visual-paradigm] UML Class Diagram Tutorial](https://www.visual-paradigm.com/guide/uml-unified-modeling-language/uml-class-diagram-tutorial/)
- [[MCL Docs] yoyo. C++ Lecture 11: 物件導向三大特性](https://docs.mcl.math.ncu.edu.tw/books/%E7%A8%8B%E5%BC%8F%E8%AA%9E%E8%A8%80/page/ep-11-%E7%89%A9%E4%BB%B6%E5%B0%8E%E5%90%91)
這篇文章將介紹物件導向會提供的三個核心特性。
## 事前功課
完成以下使用 UML class diagram 所描述的類別
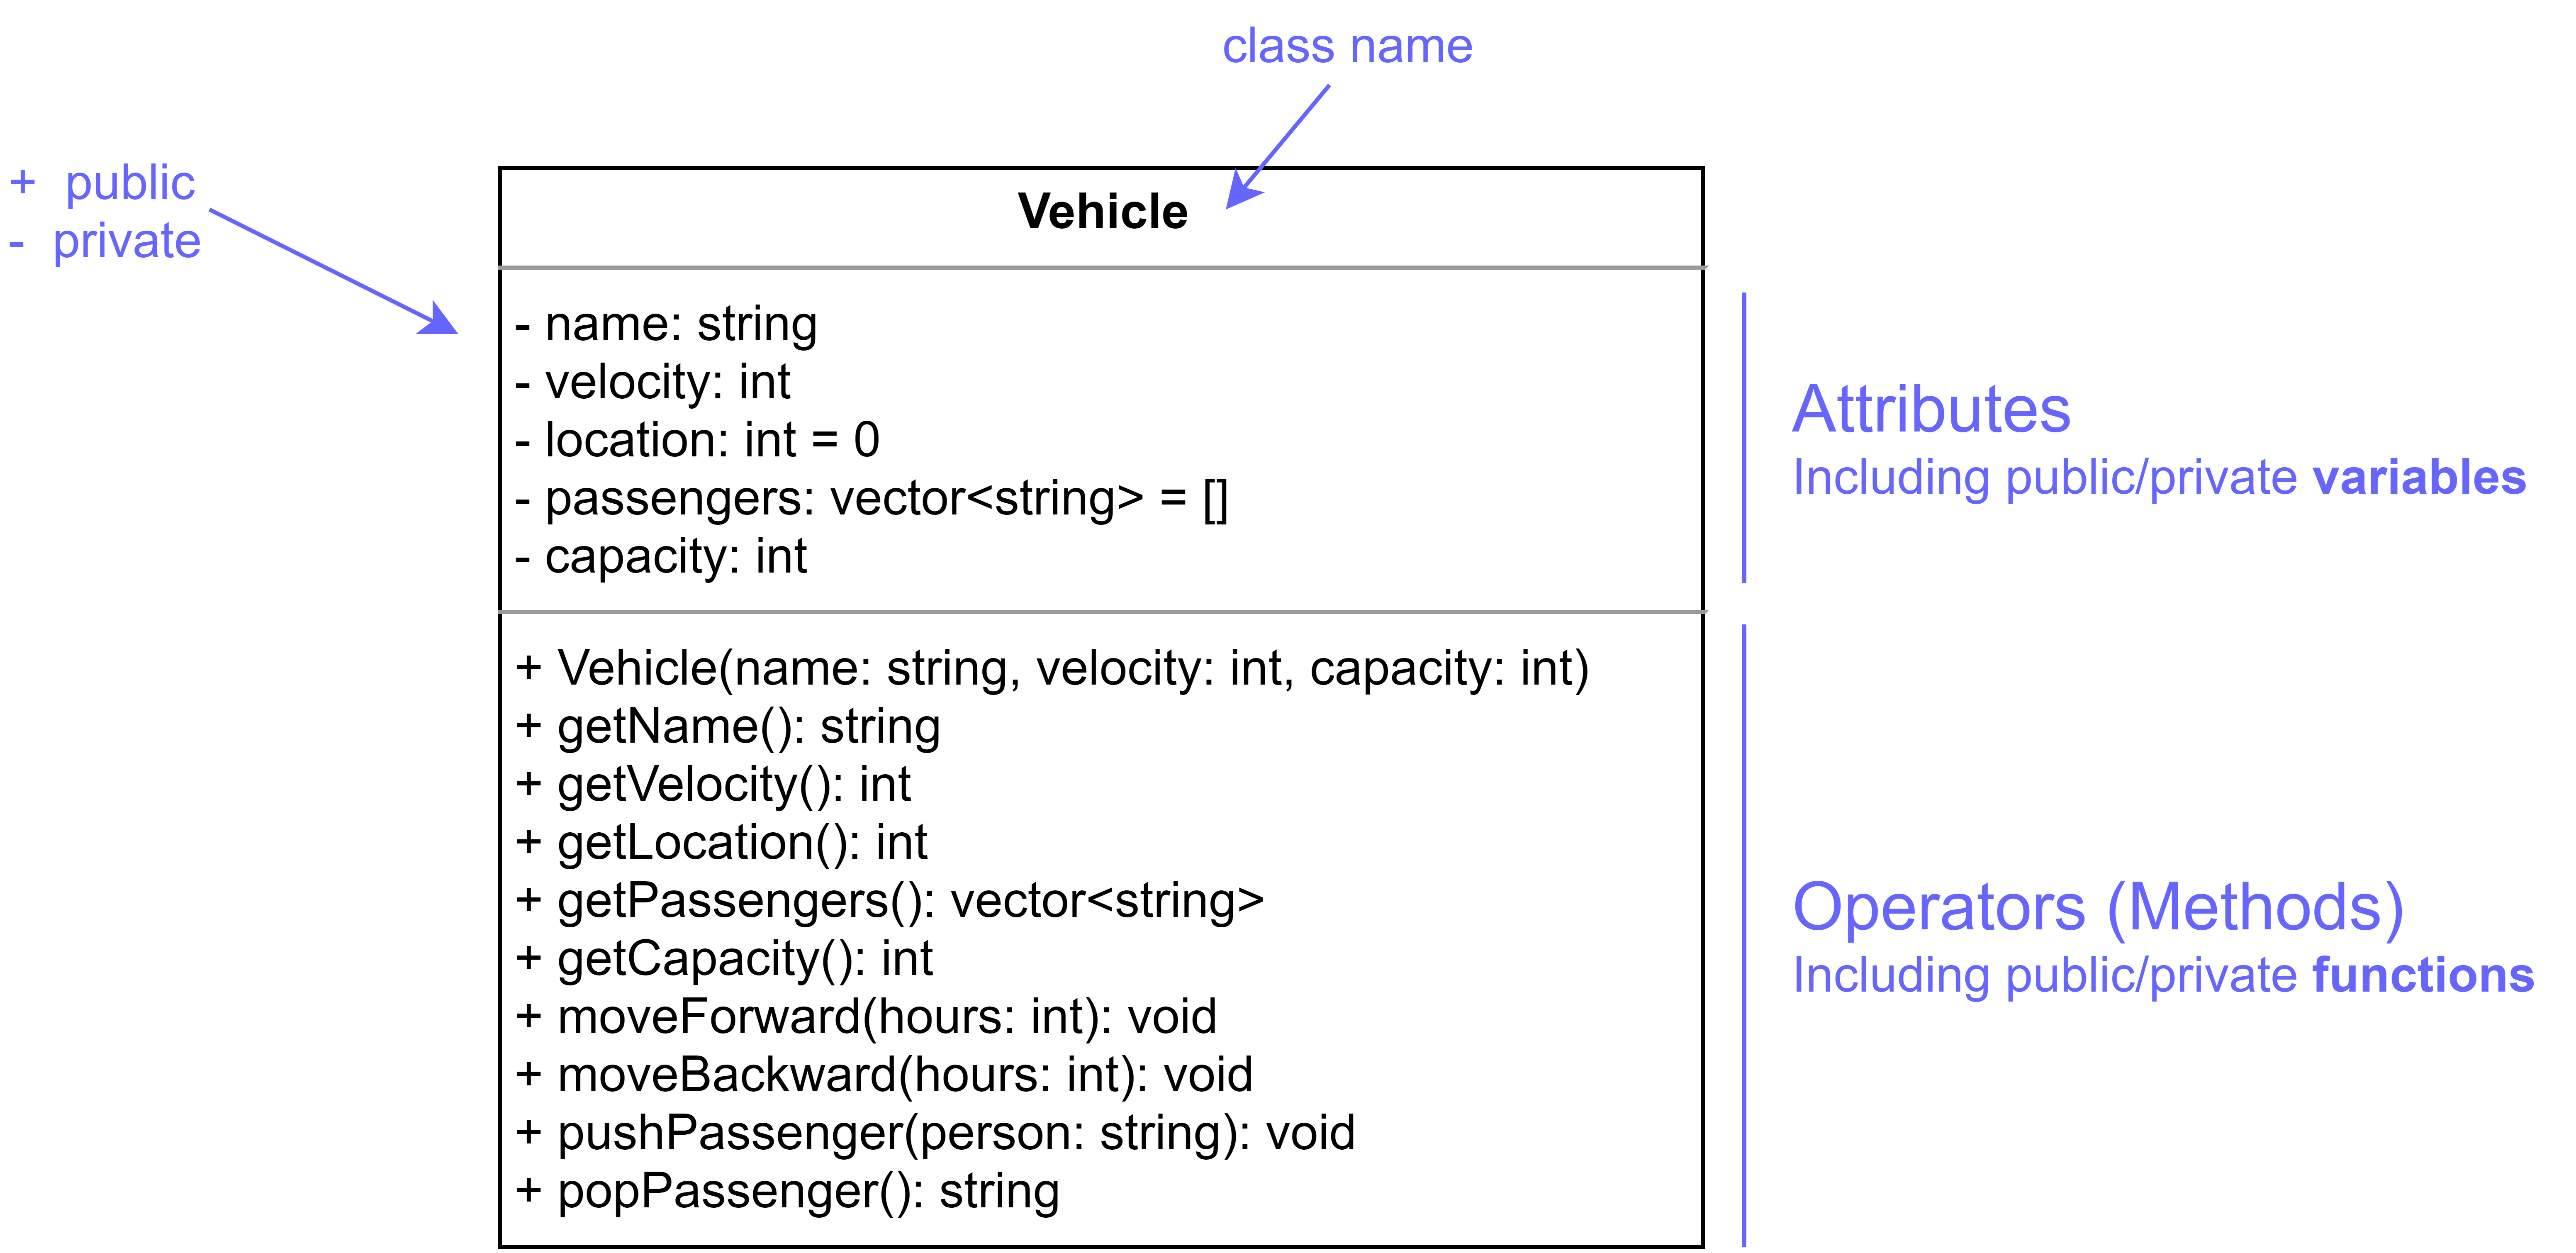
並使以下主函數可順利執行
- C++
```cpp=
using namespace std;
void showPublicMessage(Vehicle vehicle) {
cout << "[" << vehicle.getName() << "] "
<< "vel: " << vehicle.getVelocity() << ", "
<< "loc: " << vehicle.getLocation() << ", "
<< "#passengers: " << vehicle.getPassengers().size()
<< endl;
}
int main() {
int hours = 10;
Vehicle car("Toyota", 60, 4);
Vehicle bicycle("Giant", 10, 1);
car.pushPassenger("Alice");
bicycle.pushPassenger("Bob");
car.moveBackward(hours);
bicycle.moveForward(hours);
showPublicMessage(car);
showPublicMessage(bicycle);
return 0;
}
```
:::spoiler Java
```java=
public class App {
public static void main(String[] args) throws Exception {
int hours = 10;
Vehicle car = new Vehicle("Toyota", 60, 4);
Vehicle bicycle = new Vehicle("Giant", 10, 1);
car.pushPassenger("Alice");
bicycle.pushPassenger("Bob");
car.moveBackward(hours);
bicycle.moveForward(hours);
System.out.printf("[%s] vel: %d, loc: %d, #passengers: %d\n", car.getName(), car.getVelocity(),
car.getLocation(), car.getPassengers().size());
System.out.printf("[%s] vel: %d, loc: %d, #passengers: %d\n", bicycle.getName(), bicycle.getVelocity(),
bicycle.getLocation(), bicycle.getPassengers().size());
}
}
```
:::
:::spoiler Python 3
```python=
hours = 10
car = Vehicle('Toyota', 60, 4)
bicycle = Vehicle('Giant', 10, 1)
car.pushPassenger('Alice')
bicycle.pushPassenger('Bob')
car.moveBackward(hours)
bicycle.moveForward(hours)
print('[{}] vel: {}, loc: {}, #passengers: {}'.format(
car.getName(), car.getVelocity(), car.getLocation(),
len(car.getPassengers())))
print('[{}] vel: {}, loc: {}, #passengers: {}'.format(
bicycle.getName(), bicycle.getVelocity(), bicycle.getLocation(),
len(bicycle.getPassengers())))
```
:::
:::spoiler JavaScript ES6^
```javascript=
hours = 10;
car = new Vehicle('Toyota', 60, 4);
bicycle = new Vehicle('Giant', 10, 1);
car.pushPassenger('Alice');
bicycle.pushPassenger('Bob');
car.moveBackward(hours);
bicycle.moveForward(hours);
console.log(`[${car.getName()}] vel: ${car.getVelocity()}, loc: ${car.getLocation()}, #passengers: ${car.getPassengers().length}`)
console.log(`[${bicycle.getName()}] vel: ${bicycle.getVelocity()}, loc: ${bicycle.getLocation()}, #passengers: ${bicycle.getPassengers().length}`)
```
:::
Output:
```
[Toyota] vel: 60, loc: -600, #passengers: 1
[Giant] vel: 10, loc: 100, #passengers: 1
```
## 三大特性
具備物件導向程式設計的類別會具備以下三個特性:
1. 封裝 Encapsulation
2. 繼承 Inheritance
3. 多型 Polymorphism
我們先從這三個特性開始講述。
## 封裝 Encapsulation
封裝的概念是這三個特性中最好理解的──又或者說他就是我們目前在做的事情:把實作細節包裝起來後,開介面出來供程式設計師使用。
> 封裝(Encapsulation)是指,一種將抽象性函式介面的實作細節部份包裝、隱藏起來的方法。
>
> 適當的封裝,可以將物件使用介面的程式實作部份隱藏起來,不讓使用者看到,同時確保使用者無法任意更改物件內部的重要資料,若想接觸資料只能通過公開接入方法(Publicly accessible methods)的方式( 如:"getters" 和"setters")。它可以讓程式碼更容易理解與維護,也加強了程式碼的安全性。
>
> [name=wikipedia]
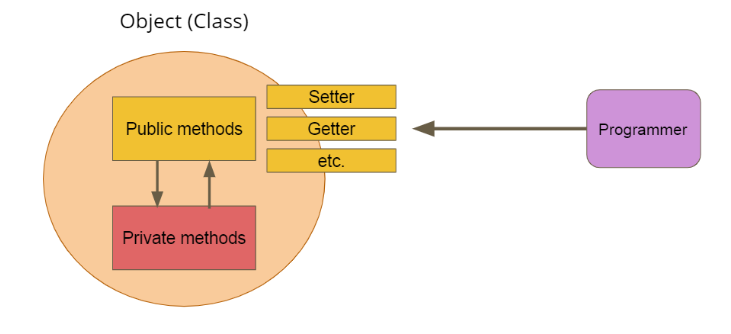
> <i class="fa fa-image"></i> 封裝示意圖
> [name=yoyo. [C++ Lecture 11: 物件導向三大特性](https://docs.mcl.math.ncu.edu.tw/books/%E7%A8%8B%E5%BC%8F%E8%AA%9E%E8%A8%80/page/ep-11-%E7%89%A9%E4%BB%B6%E5%B0%8E%E5%90%91)]
## 繼承 Inheritance <small>具備強烈隸屬關係時適用</small>
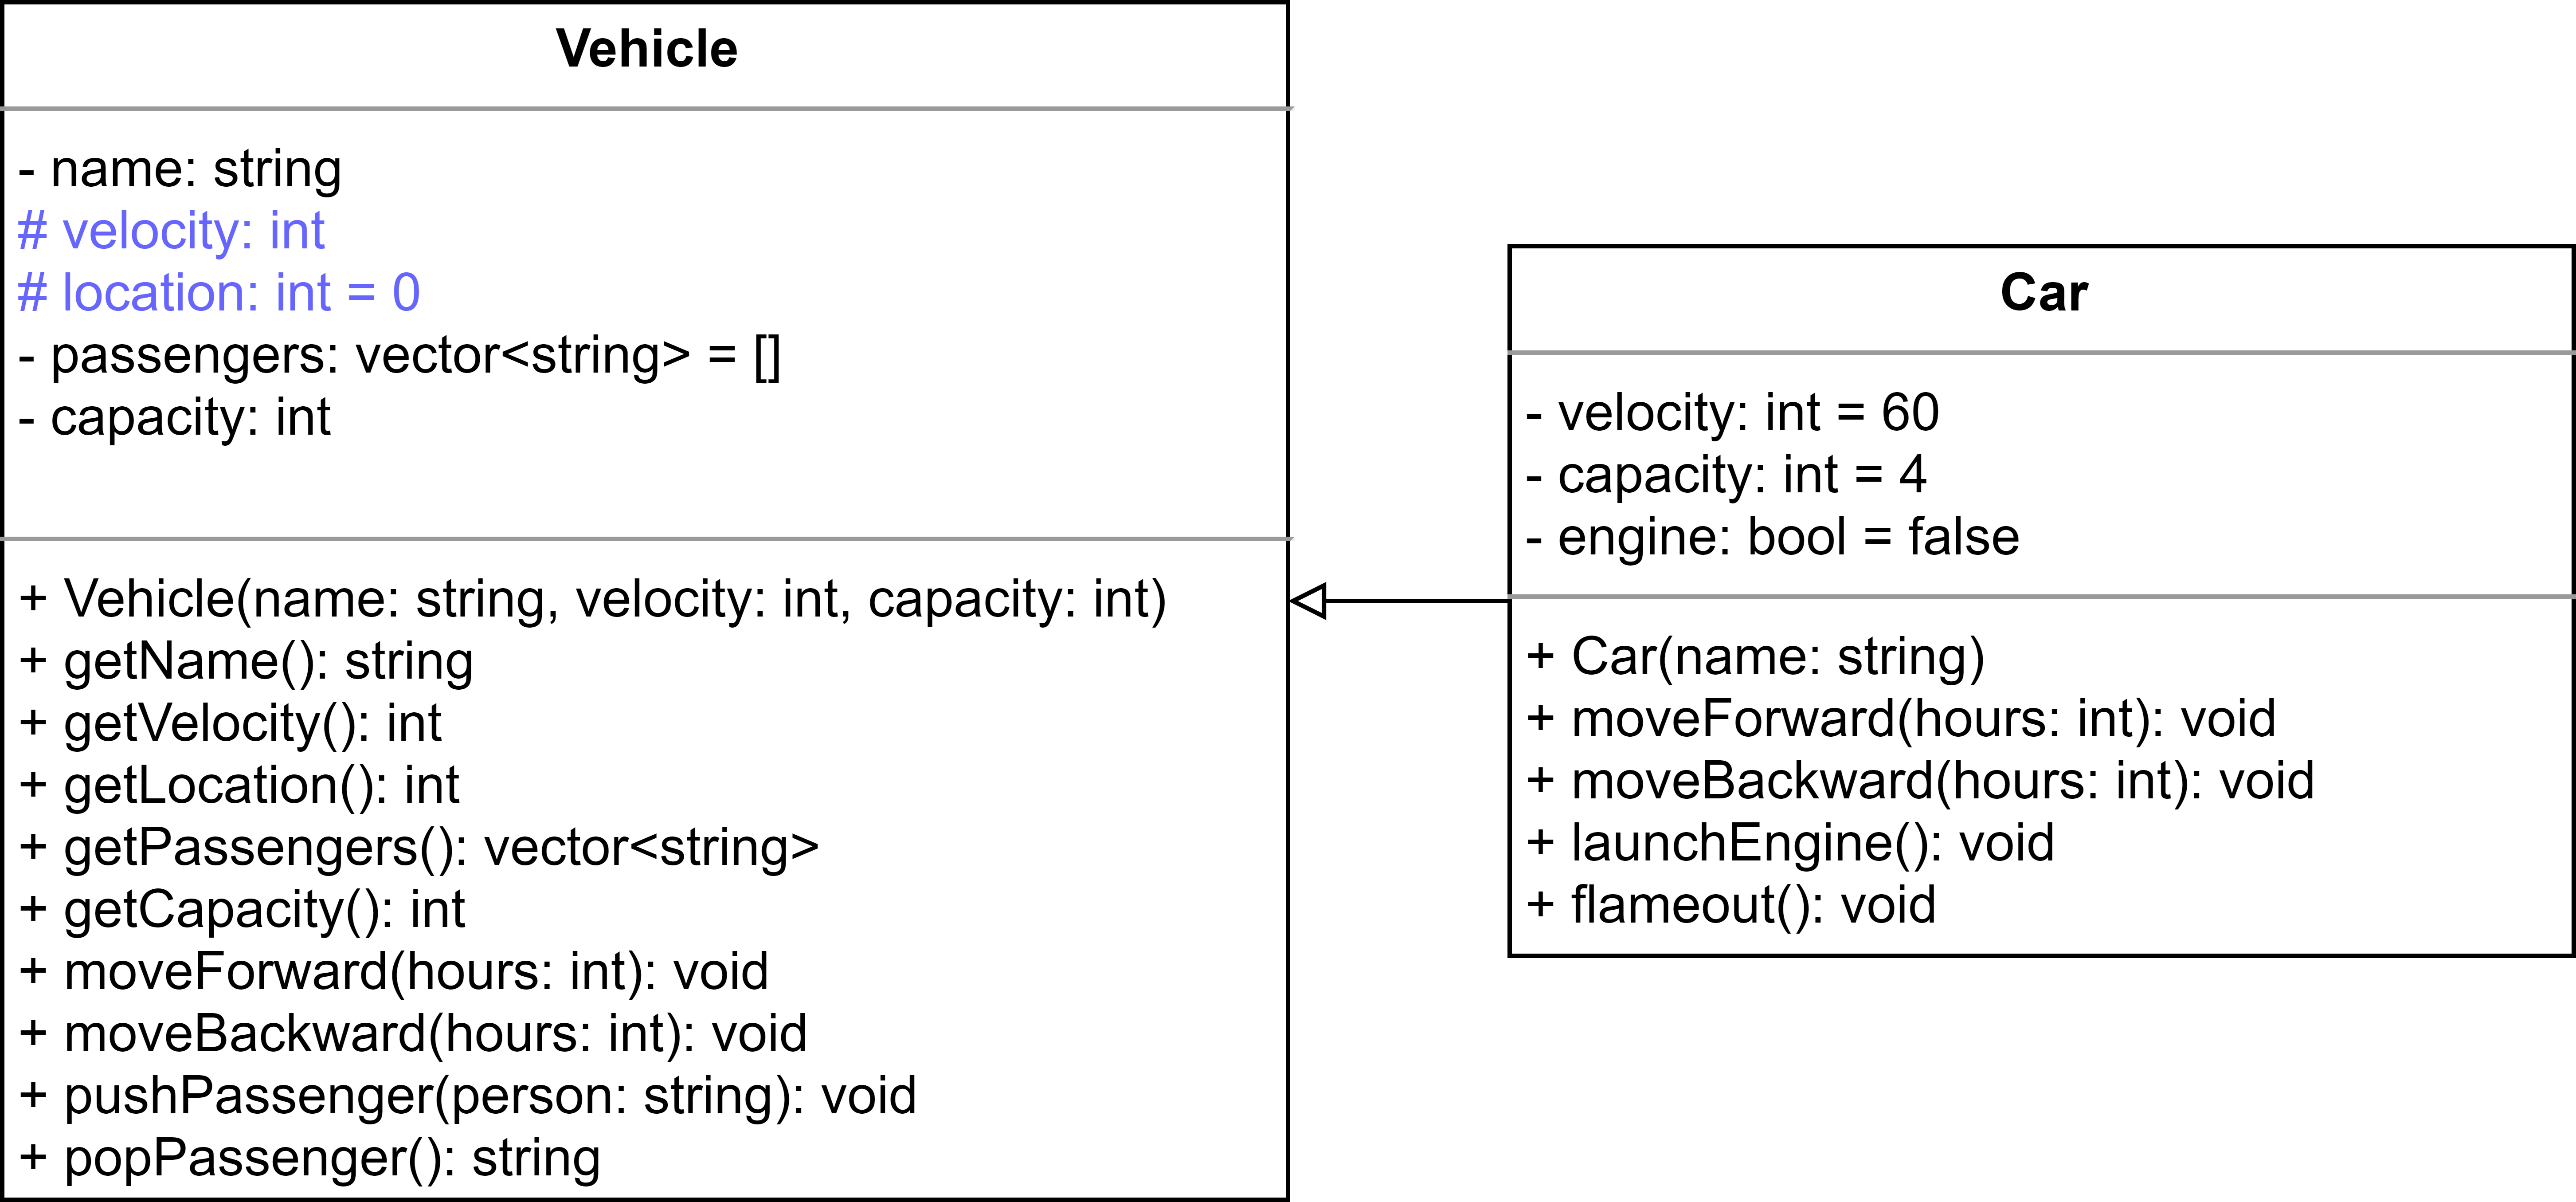
今天考慮說我們要建立一個新的類別叫做 `Car`,他除了具備交通工具所需要的要素外,還需要有引擎發動與否的控制處理 (如果引擎沒有發動,那他的移動速率就是零)。用 UML 的觀點來看他會呈現以下形式:
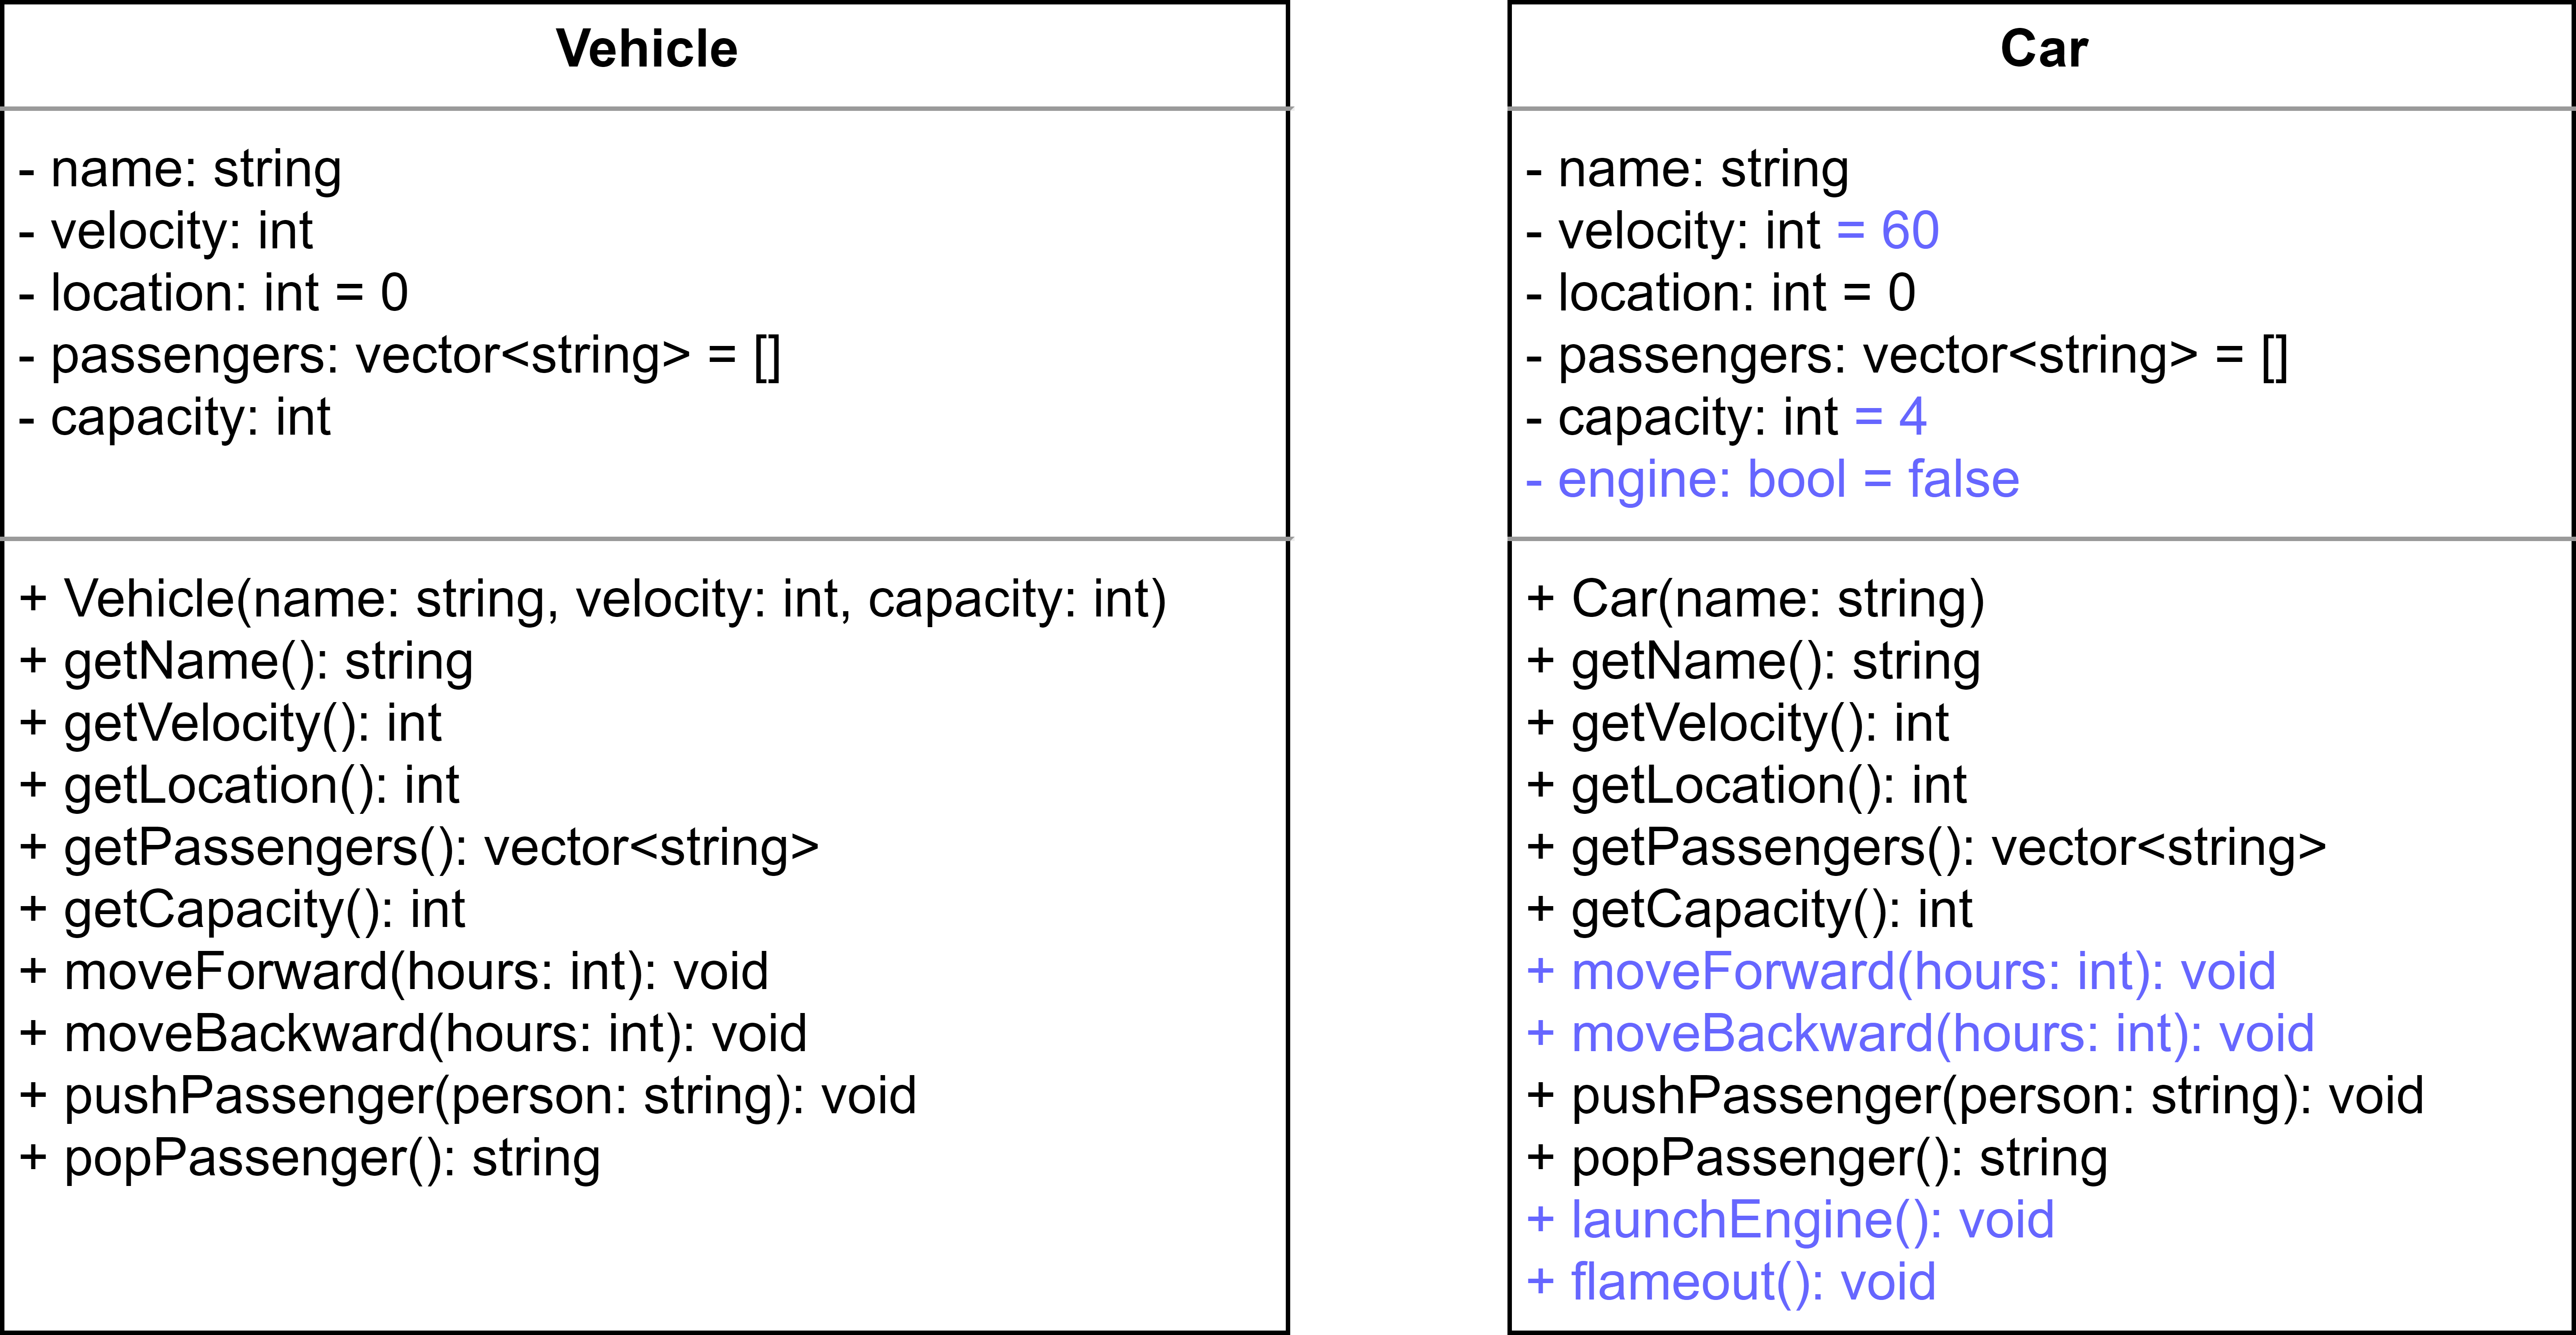
其中你會看到 `Car` 和 `Vehicle` 在變數跟方法上有一定的相似程度 (不同之處用顏色標記),而 `moveForward` 和 `moveBackward` 兩者因為在實作上需要多考慮 `engine` 是否為 `true`,整體邏輯和 `Vehicle` 不一樣,所以在 `Car` 這邊需要**覆寫 (override)**。
然而除了變數與方法上的差異外,在這兩者之間的一個關鍵要素,在於 **汽車 (`Car`) 在概念意義上是交通工具 (`Vehicle`) 的一種,這是使用繼承與否最重要的判斷依據。**
使用繼承後,從 UML 觀點來看他會變成以下樣貌
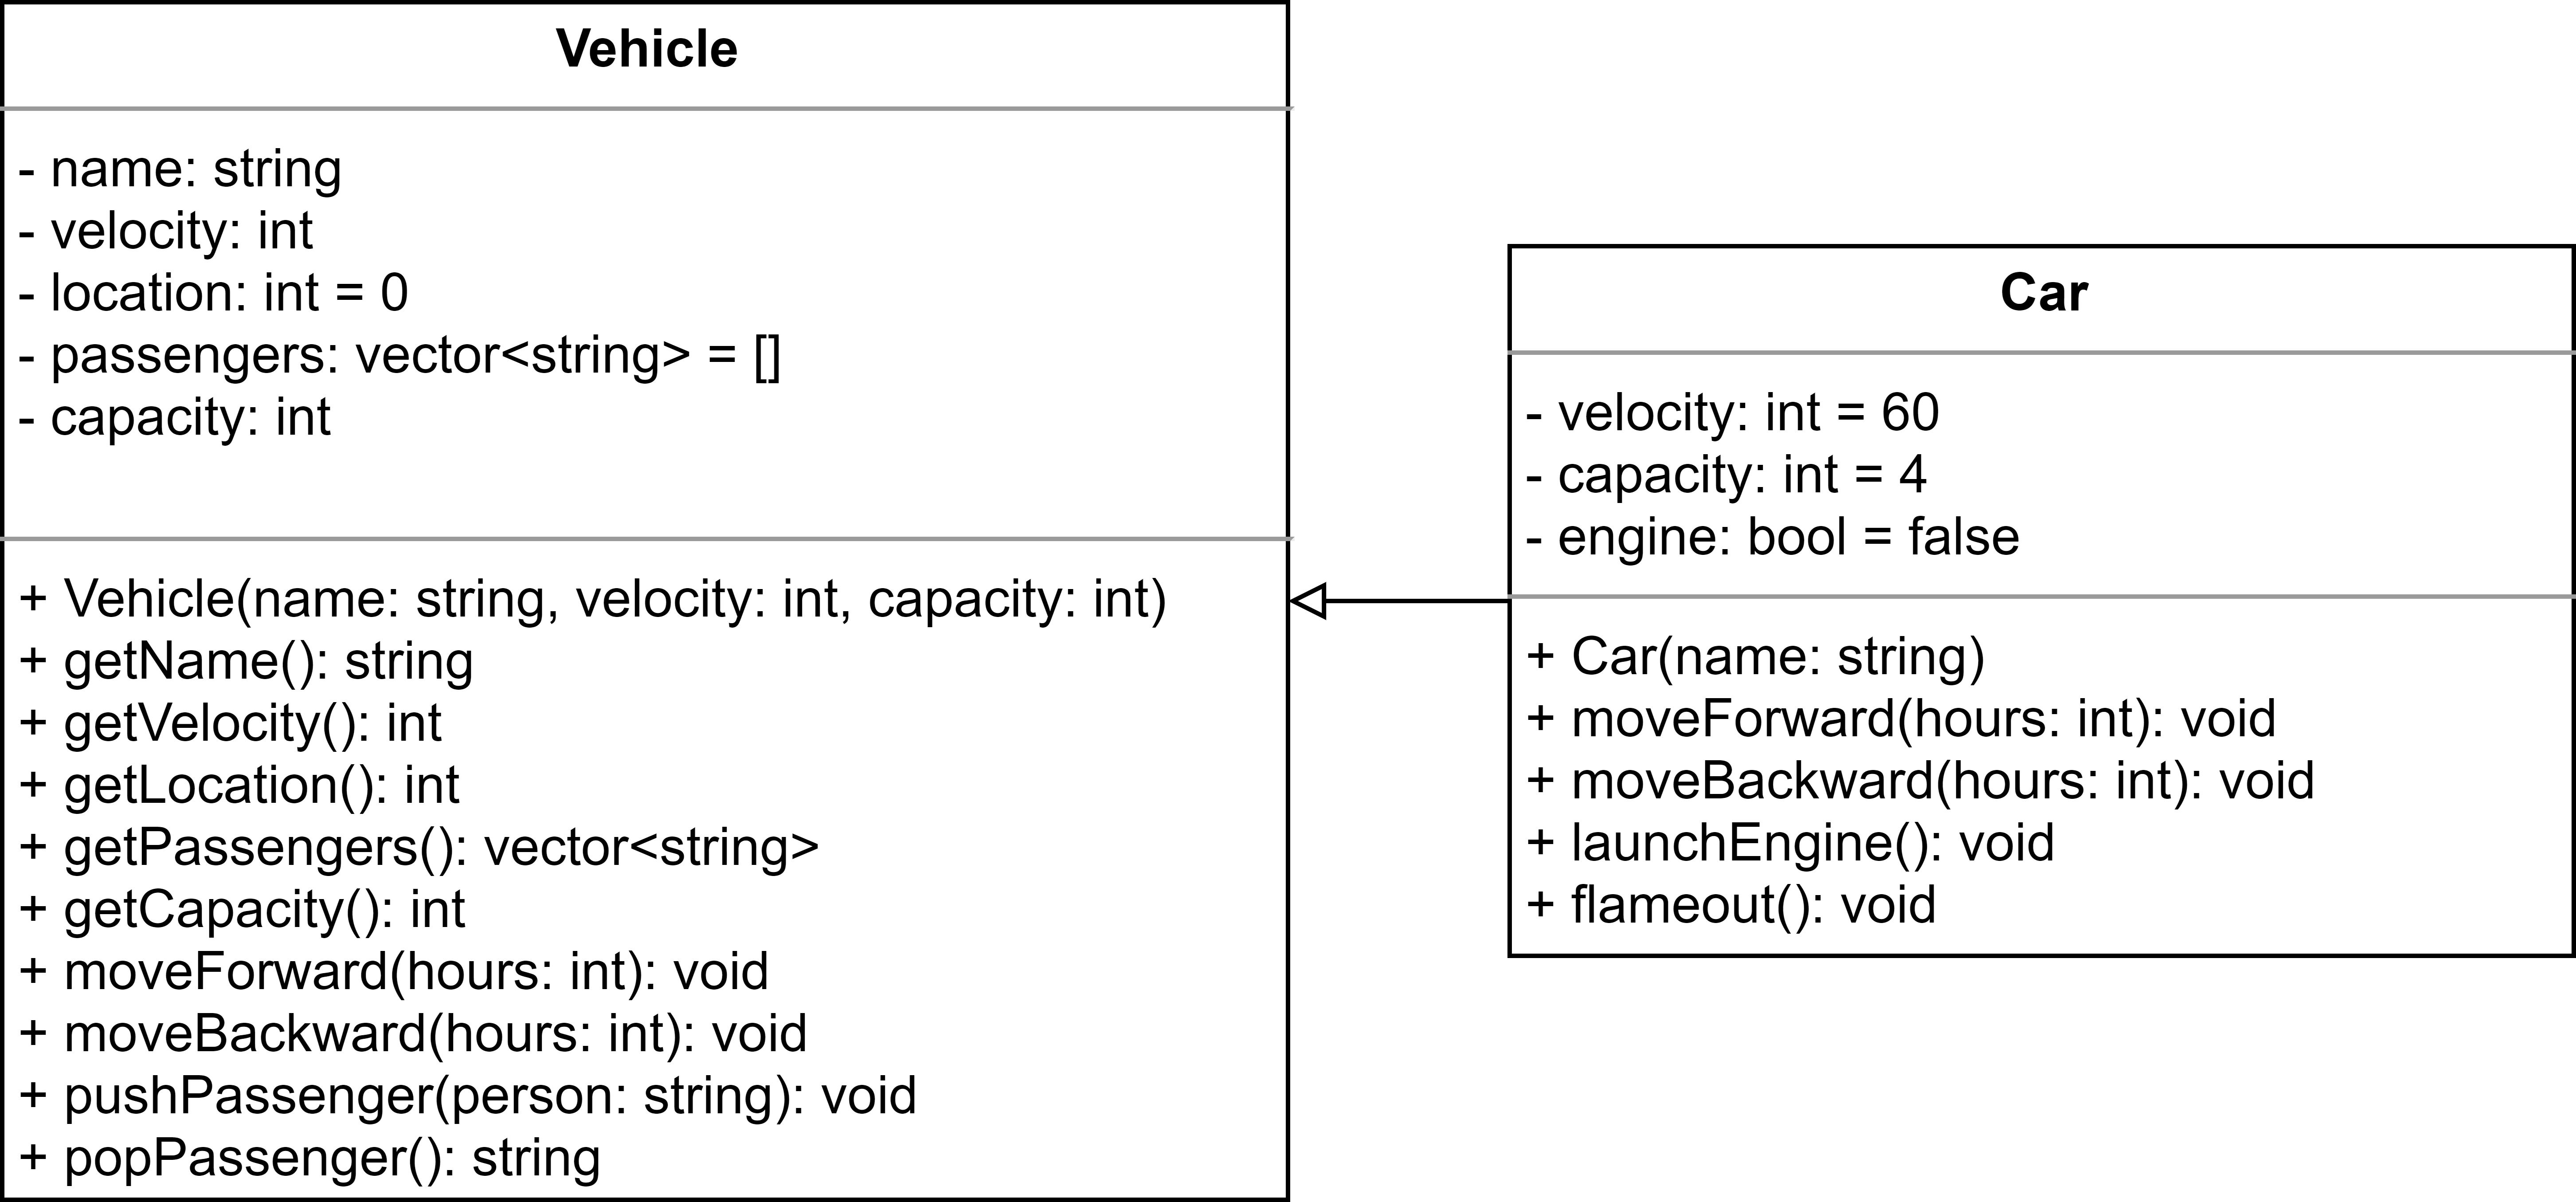
白色實心箭頭方向可以解讀成類別 `Car` 繼承類別 `Vehicle`.
了解他的框架後,我們來看程式上如何實現:
- C++
```cpp=
class Car : public Vehicle {
private:
bool engine;
public:
Car(string name) : Vehicle(name, 60, 4) {
this->engine = false;
}
// override moveForward method
void moveForward(int hours) {
if (this->engine) {
// call parent method written in Vehicle class
Vehicle::moveForward(hours);
}
}
// override moveBack method
void moveBackward(int hours) {
if (this->engine) {
// call parent method written in Vehicle class
Vehicle::moveBackward(hours);
}
}
void launchEngine() {
this->engine = true;
}
void flameout() {
this->engine = false;
}
};
void showPublicMessage(Car vehicle) {
cout << "[" << vehicle.getName() << "] "
<< "vel: " << vehicle.getVelocity() << ", "
<< "loc: " << vehicle.getLocation() << ", "
<< "#passengers: " << vehicle.getPassengers().size()
<< endl;
}
void showPublicMessage(Vehicle vehicle) {
cout << "[" << vehicle.getName() << "] "
<< "vel: " << vehicle.getVelocity() << ", "
<< "loc: " << vehicle.getLocation() << ", "
<< "#passengers: " << vehicle.getPassengers().size()
<< endl;
}
int main() {
int hours = 10;
Car car("Toyota");
Vehicle bicycle("Giant", 10, 1);
car.pushPassenger("Alice");
bicycle.pushPassenger("Bob");
car.moveBackward(hours);
bicycle.moveForward(hours);
showPublicMessage(car);
showPublicMessage(bicycle);
car.launchEngine();
car.moveForward(hours);
showPublicMessage(car);
return 0;
}
```
> 其中你會發現在 `Car` 類別裡面並沒有宣告如 `name`、`getVelocity` 等變數跟函數,而他們的作用會與 `Vehicle` 一致。
> 然後這邊 `showPublicMessage` 偷偷使用了 Overloading 的特性:同樣的函數名稱,但有著不同的型態結構:
> * `void showPublicMessage(Vehicle);`
> * `void showPublicMessage(Car);`
:::spoiler Java (待補)
:::
:::spoiler Python 3
```python=
class Car(Vehicle):
def __init__(self, name):
super(Car, self).__init__(name, 60, 4)
self.engine = False
def moveForward(self, hours):
if self.engine:
super().moveForward(hours)
def moveBackward(self, hours):
if self.engine:
super().moveBackward(hours)
def launchEngine(self):
self.engine = True
def flameout(self):
self.engine = False
```
:::
:::spoiler JavaScript ES6^ (待補)
:::
此範例程式碼執行結果如下:
```
[Toyota] vel: 60, loc: 0, #passengers: 1
[Giant] vel: 10, loc: 100, #passengers: 1
[Toyota] vel: 60, loc: 600, #passengers: 1
```
### Protected <small>C++、Java 適用</small>
根據上面的例子 `moveForward` 我們使用以下實作方法
- C++
```cpp=
void moveForward(int hours) {
if (this->engine) {
// call parent method written in Vehicle class
Vehicle::moveForward(hours);
}
}
```
:::spoiler Java (待補)
:::
避免我們直接取用 `location` 和 `velocity` 這些在 `Vehicle` 的私有成員變數,那假若我們將方法改寫成
- C++
```cpp=
void moveForward(int hours) {
if (this->engine) {
this->location += hours * this->velocity; // pass?
}
}
```
:::spoiler Java (待補)
:::
是否會編譯成功呢?
答案是**不行**的,這裡的私有是**僅限 `Vehicle` 自己使用,並不包括繼承他的類別。** 而假設今天程式設計師的需求是
1. 外部 (指實體化出來的物件) 依然不可以直接取用,
2. 但繼承他的類別中可以使用,
這時候你便需要在 `Vehicle` 對他們使用 `protected` 這個權限:
- C++
```cpp=
class Vehicle {
private:
string name;
vector<string> passengers;
int capacity;
protected:
int velocity;
int location;
public:
// ...
};
```
:::spoiler Java (待補)
:::
在這樣的規範下,你才可以在 `Car` 當中直接取得這個變數
- C++
```cpp=
void moveForward(int hours) {
if (this->engine) {
this->location += hours * this->velocity; // pass
}
}
```
:::spoiler Java (待補)
:::
回過頭來看 UML ,此時會使用 `#` 來表達 `protected` 的意思:
> 在這個案例當中,你依然可以透過 `Vehicle::getVelocity()` 和 `Vehicle::getLocation()` 這兩個公開方法取得這些值,不過當此變數完全沒有任何公開 getter 時,你可以透過這個方式去周全保護你不想開放的變數。
在這個章節的最後附上三個 Access modifiers 的權限規則:
| Access Modifier \ Identity | 內部 | 繼承者 | 外部 |
| -------------------------- | ------------------ | ------------------ | ------------------ |
| public | :heavy_check_mark: | :heavy_check_mark: | :heavy_check_mark: |
| protected | :heavy_check_mark: | :heavy_check_mark: | :x: |
| private | :heavy_check_mark: | :x: | :x: |
## 多型 Polymorphism <small>繼承的特殊應用,靜態型別語言適用 (C++、Java)</small>
> 對於動態型別語言則有一種概念叫做 Duck typing:
> 「當看到一隻鳥走起來像鴨子、游泳起來像鴨子、叫起來也像鴨子,那麼這隻鳥就可以被稱為鴨子。」
> [name=wikipedia: [Duck typing](https://zh.wikipedia.org/zh-tw/%E9%B8%AD%E5%AD%90%E7%B1%BB%E5%9E%8B)]
首先我們定義另外一個也繼承 `Vehicle` 的類別,`Bicycle`。
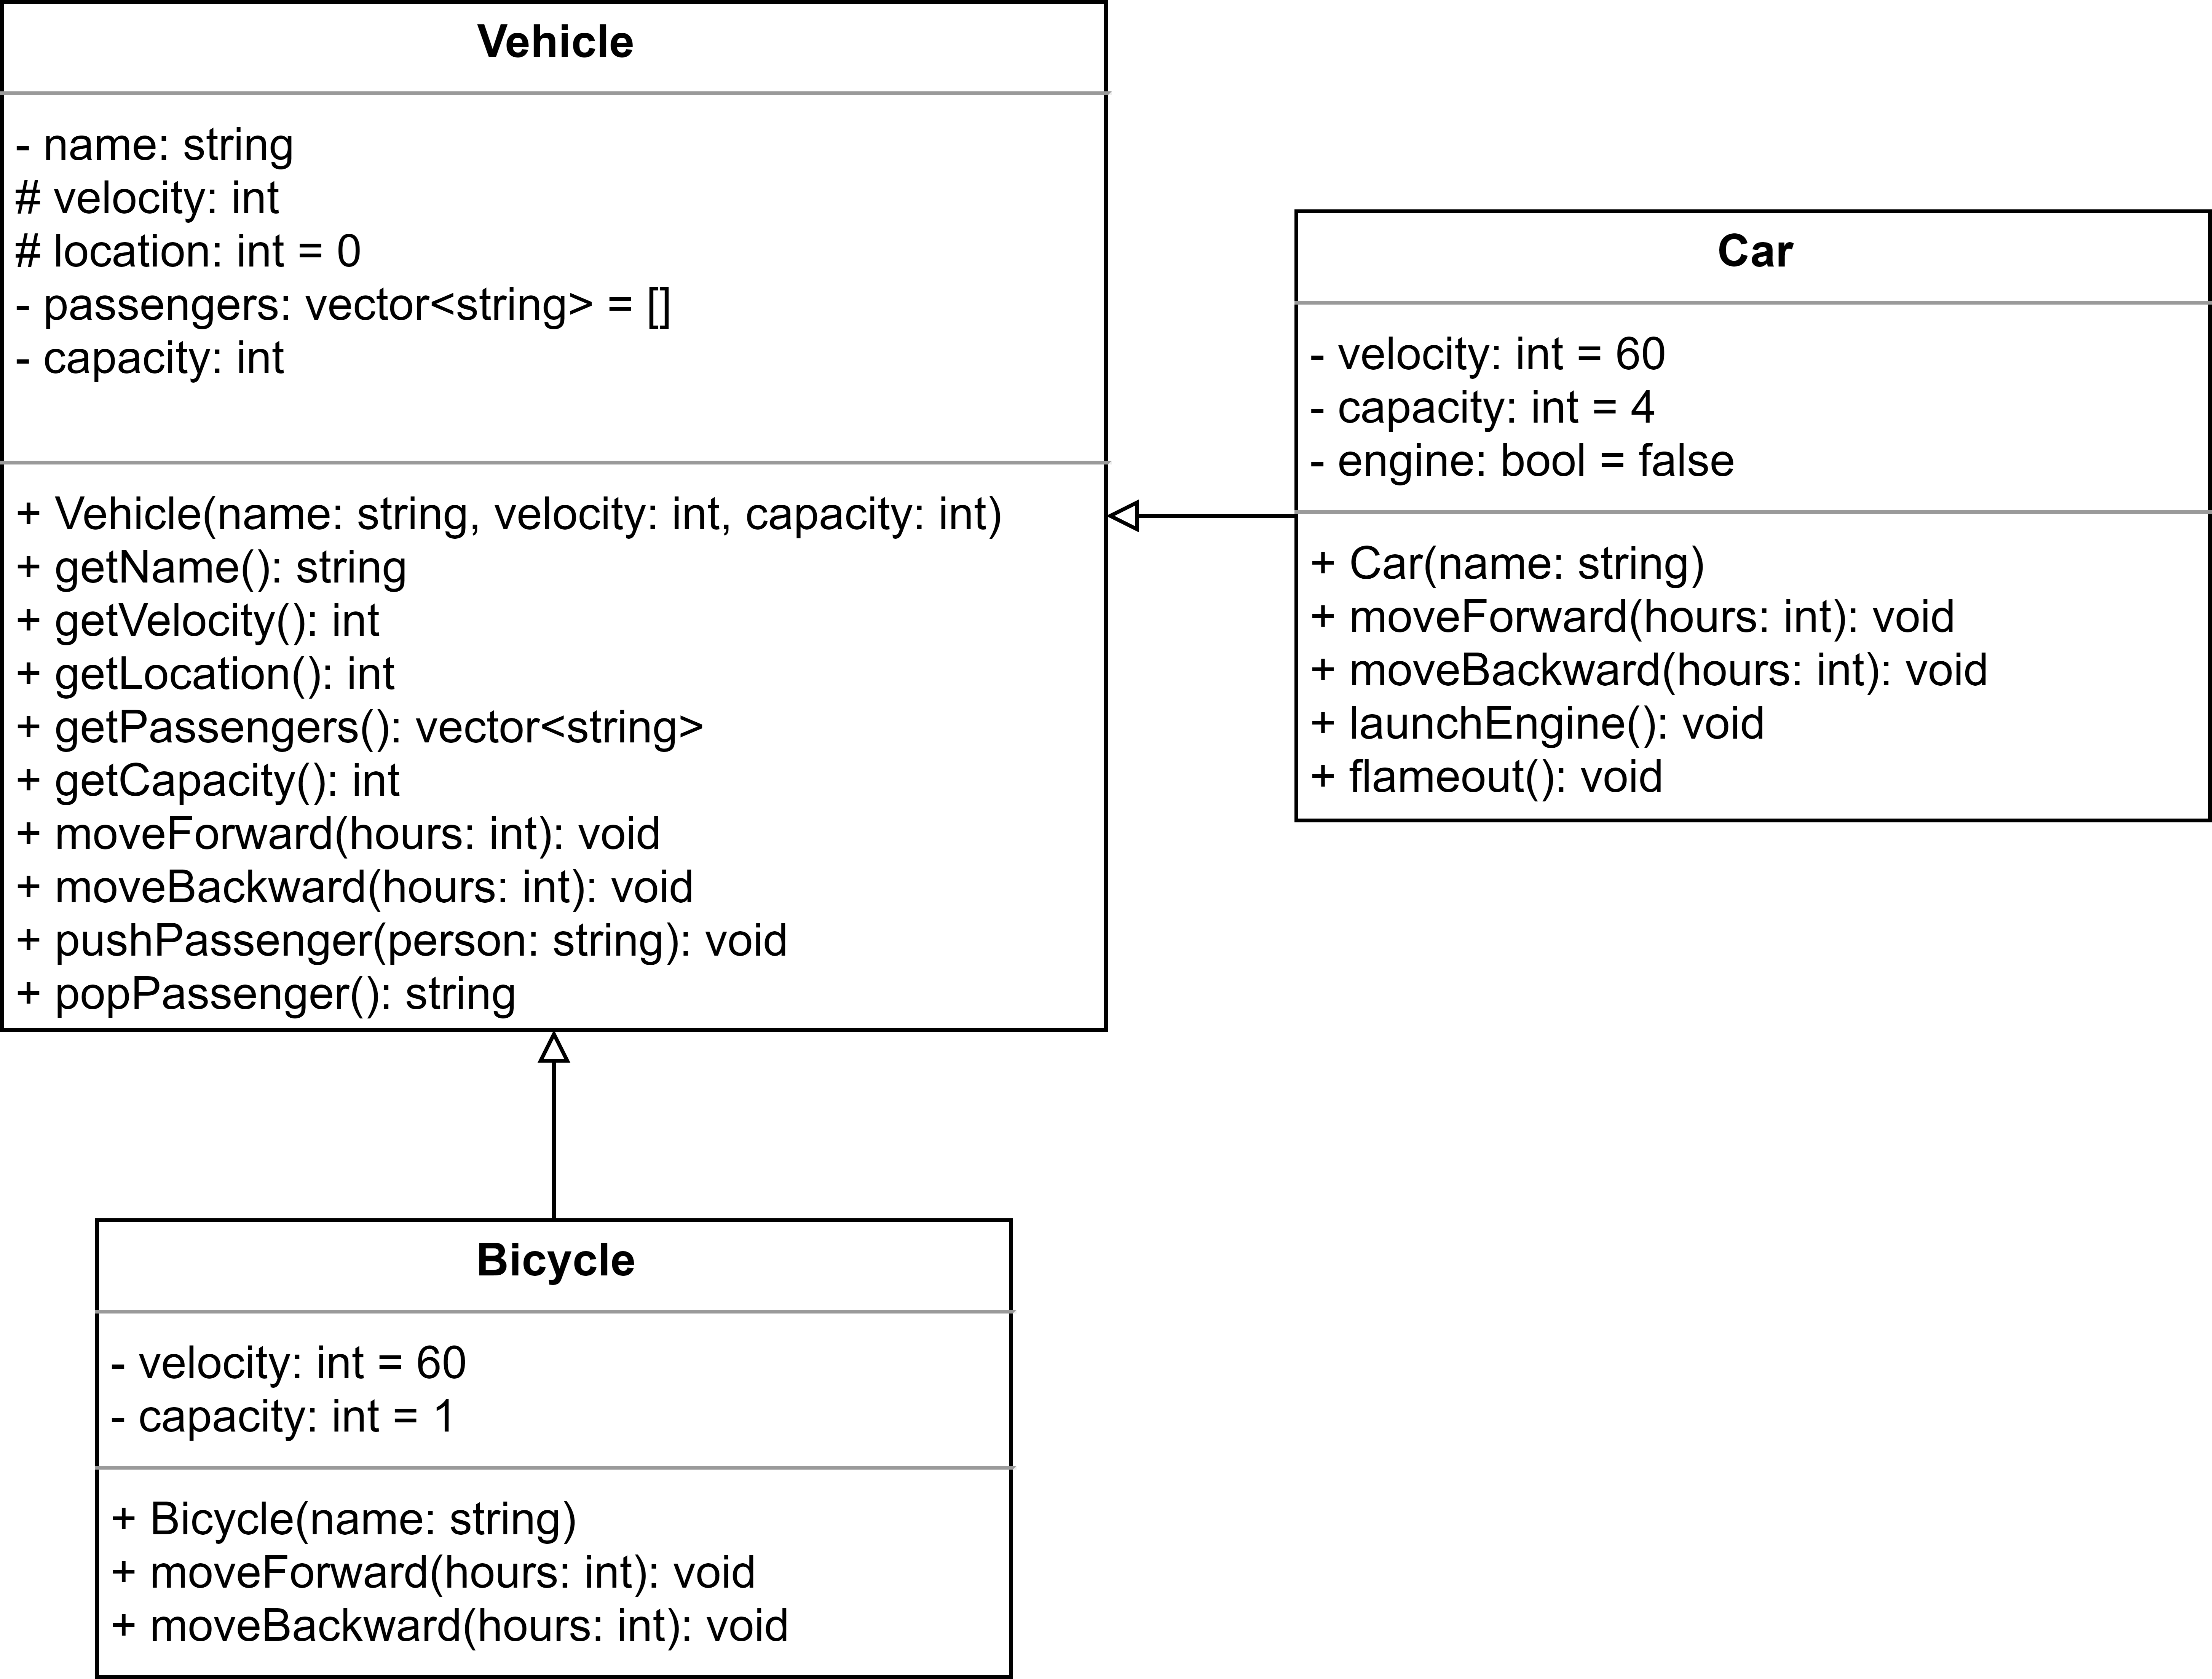
從繼承的觀點出發,你可以理解成「每個交通工具,都有著共通的特性」,比如都會前進 `moveForward`、後退 `moveBackward`。
此時你有一種寫法是:你拿到一堆交通工具物件 `Vehicle` (可能是汽車 `Car` 也可能是腳踏車 `Bicycle`),呼叫著在 `Vehicle` 中存在的方法,並在各自物件中做不同的處理。
這個特性在當你遇到「面對不同的物件型態,施以相同的方法呼叫」時會發揮作用。
> A majority of computer programs need to model collections of values in which the values
> * are of the same type, and
> * must be processed in the same way.
>
> [name=Fu-Hau Hsu. Principles of Programming Languages. Ch. 6]
接下來以 `moveForward` `moveBackward` 為例,我們討論在不同語言間要如何實現多型。
> #### Dynamic polymorphism 與 Static polymorphism
> 從程式碼到執行,基本上會經過解析、編譯、組譯、連結這些統稱編譯階段 (Compile) 後,到出現執行檔「雙擊」執行進入執行階段 (Runtime) 跑出結果。
>
> 在這裡動態與靜態的差別在於:
> * **動態多型** (Dynamic polymorphism) 在**執行階段 (Runtime)** 決定要使用 (bind) 哪個方法
> * **靜態多型** (Static polymorphism) 在**編譯階段 (Compile time)** 決定要使用 (bind) 哪個方法
### C++ Polymorphism (Dynamic polymorphism)
C++ 實現多型 (動態多型) 的條件比較多一點,他必須滿足
- `Vehicle::moveForward` 必須是一個抽象函數 (abstract function)
- 此時 `Vehicle` 變成抽象類別 (abstract class),這種類別的特性是不能夠初始化 (因為裡面的功能不完全)
- 因為不能是實體的物件,所以針對 `Vehicle` 的初始化只能是指標 (儲存一個記憶體位址),在那個位址上的值是一個實際存在的物件 (`Car` 或是 `Bicycle` 的物件)
在討論程式碼如何實作前,我們先看在 UML Diagram 上如何表達:
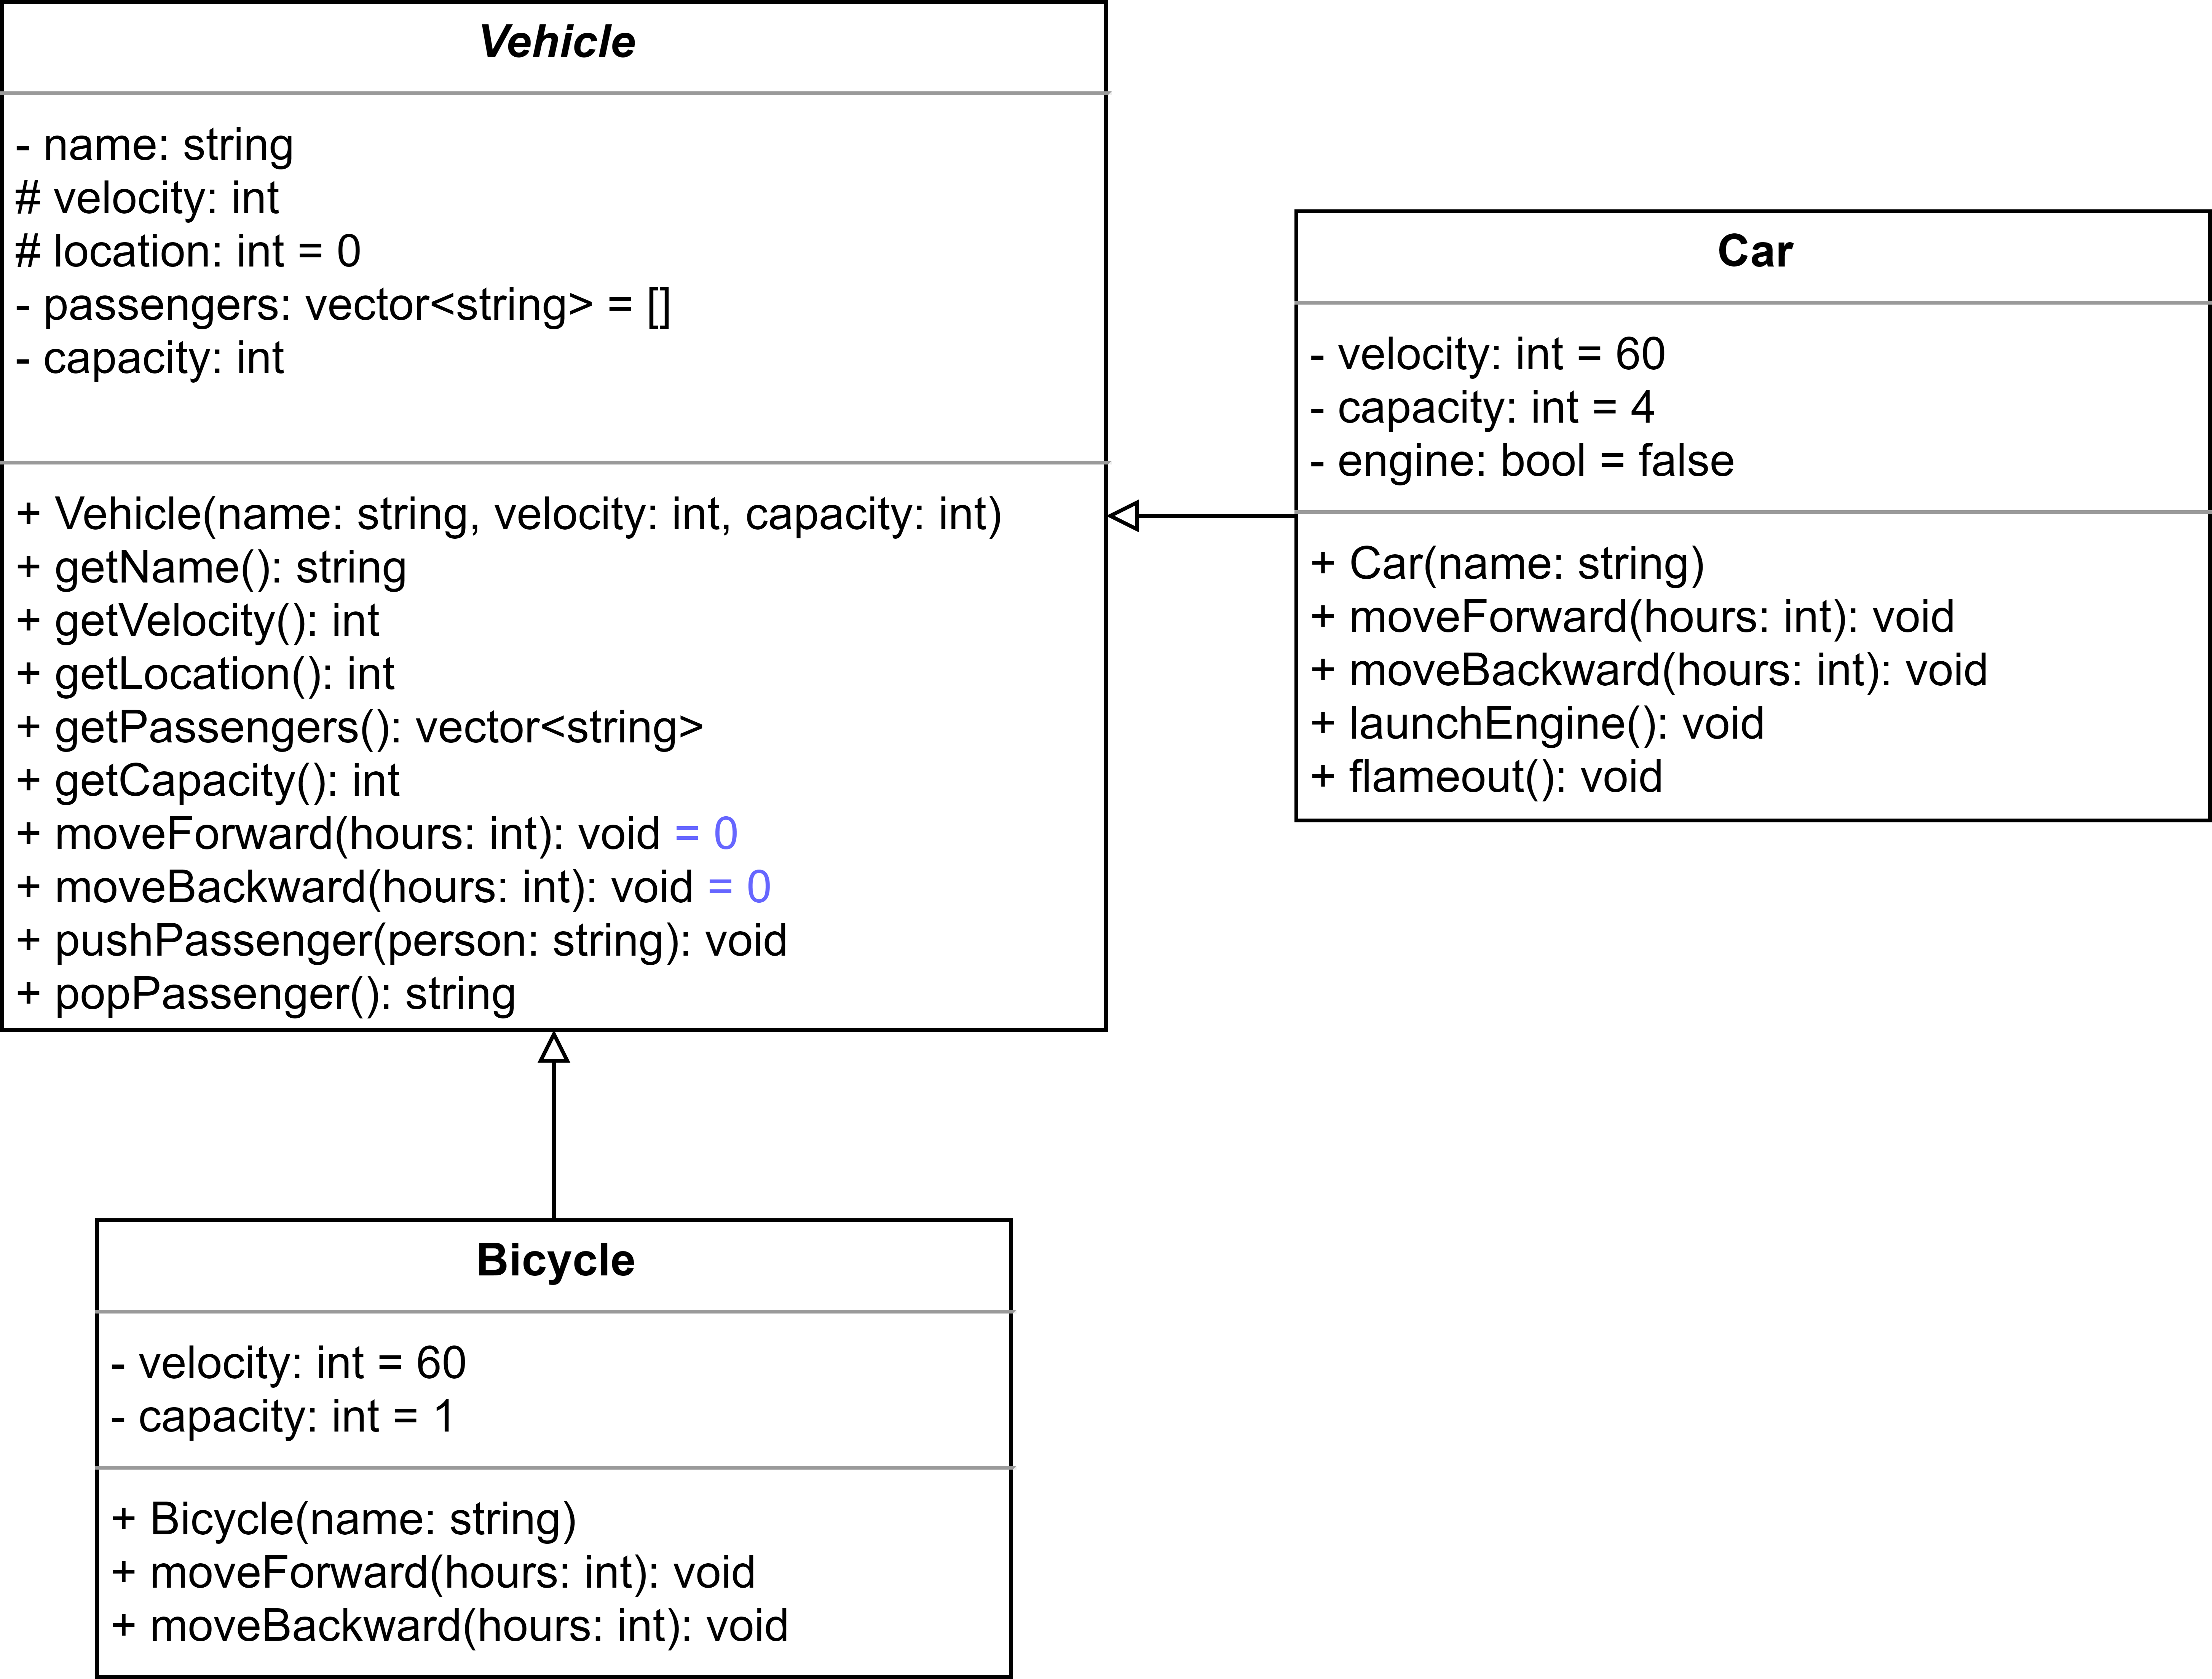
其中
* 斜體 *Vehicle* 代表該類別是抽象函數,
* 抽象函數在後面會加上 `= 0` 這個標籤。
在 C++ ,只要一個 Class 當中含有抽象函數,他就會自動變成抽象類別。而抽象類別的寫法在 C++ 需要在函數前面加上 `virtual` 關鍵字:
```cpp=
class Vehicle {
public:
virtual void moveForward(int hours) = 0;
virtual void moveBackward(int hours) = 0;
};
```
在類別 `Car` 與 `Bicycle` 則可以選擇性加上 `override` 關鍵字 (C++11 以上適用)
```cpp=
class Car {
public:
void moveForward(int hours) override {
cout << "Car :: move forward" << endl;
this->location += ( engine ? hours * this->velocity : 0);
}
void moveBackward(int hours) override {
cout << "Car :: move backward" << endl;
this->location -= ( engine ? hours * this->velocity : 0);
}
};
class Bicycle {
public:
void moveForward(int hours) override {
cout << "Bicycle :: move forward" << endl;
this->location += hours * this->velocity;
}
void moveBackward(int hours) override {
cout << "Bicycle :: move backward" << endl;
this->location -= ( engine ? hours * this->velocity : 0);
}
};
```
> 動態物件宣告方法為以下形式
>
> ```cpp
> Car *car = new Car("Bob");
> car->moveForward(10);
> ```
>
> 這種寫法被稱為動態宣告,宣告出來後,`car` 會是一個 `Car` 類型記憶體型態 (指標),儲存一個實體 `Car` 物件的記憶體位址。
>
> 更多指標操作再另外拉章節出來講。
而在 `main` 函數中,我們以下列程式碼為範例,演示其特性:
```cpp=
int main() {
Vehicle* car = new Car("Toyota");
Vehicle* bicycle = new Bicycle("Giant");
car->moveForward(10);
bicycle->moveForward(10);
return 0;
}
```
該輸出為
```
Car :: move forward
Bicycle :: move forward
```
我們再以陣列當作例子,可以凸顯出他更強大的功用:
```cpp=
int main() {
vector<Vehicle*> vehicles;
vehicles.push_back(new Car("Toyota"));
vehicles.push_back(new Bicycle("Giant"));
for (int i = 0; i < vehicles.size(); i++) {
vehicles[i]->moveForward(10);
}
return 0;
}
```
此時你會發現當有多種型別的物件,且有未知數量個物件要呼叫同個名字的方法時,使用多型的概念我們就有能力去處理。
### [WIP] Java Polymorphism